デバッグ用GUI(ImGui)の導入手順に関するメモです。
ImGuiを導入するとUE4でデバッグ用のウィンドウが楽につくることができます。
とはいっても・・
おかずさんのブログを参考に(いやむしろ8割ぐらいコピって)
自前で試して学習した内容なので正確な情報はそちらを見ましょう。
なんならコードそのまま。
pafuhana1213.hatenablog.com
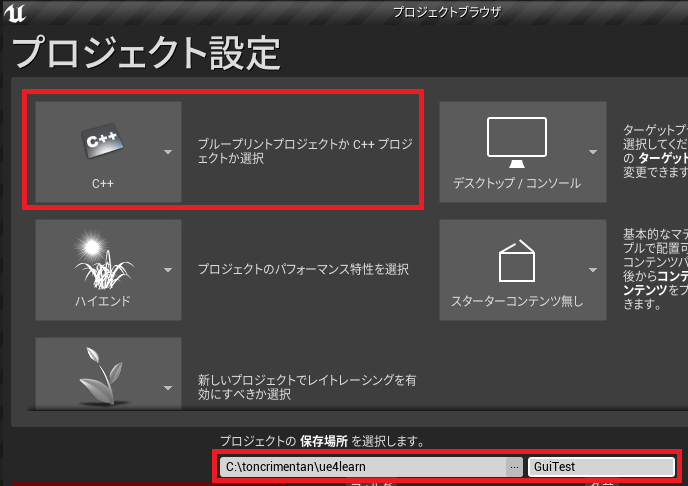
GuiTestのプロジェクトを作成します。
C++で作成、ここでは例としてプロジェクト名をGuiTestとしています。
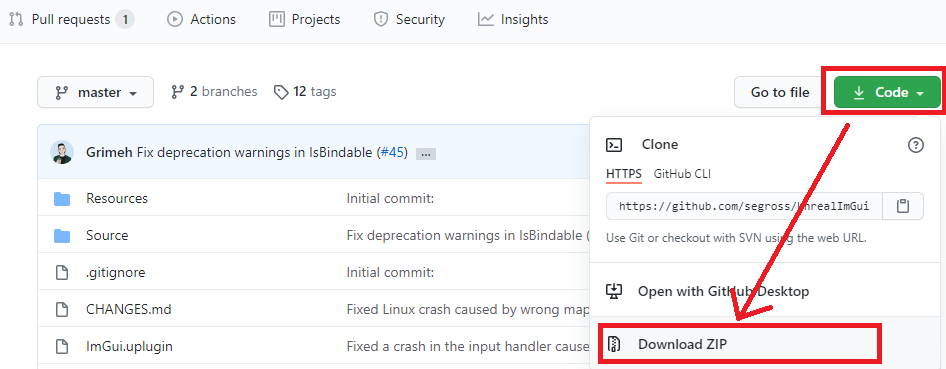
ImGuiのソースコードはこちらから取得してきます。
Code>DownloadZIPで取得
https://github.com/segross/UnrealImGui
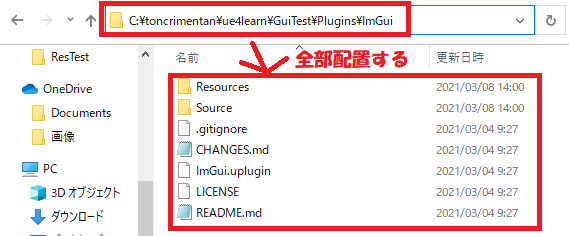
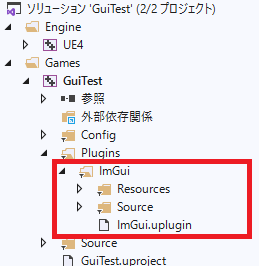
落としてきたファイルはプロジェクトのあるフォルダに
GuiTest\Plugins\ImGui とフォルダを作成し、
そこに落としてきたファイルをすべて入れます。
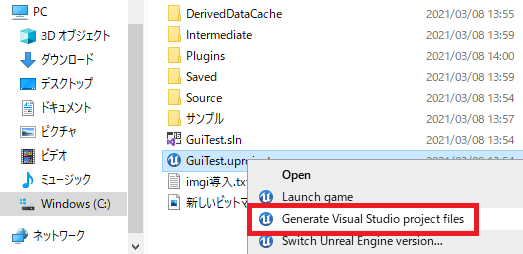
いつも通りファイルが追加されたら
GenerateVisualStudioProjectFilesを実行しVisualStudioプロジェクトを更新します。
VisualStudioプロジェクトを起動すると
無事ソースが組み込まれていることを確認できます。
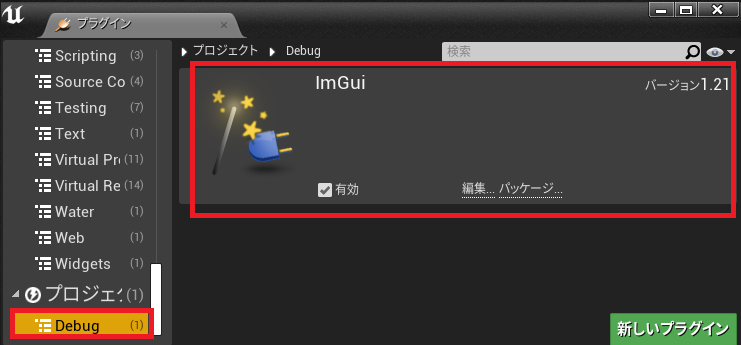
無事ビルドが通るはずなので実行し、
ImGuiプラグインが有効になっていることを確認します。
プレイし ImGui.ToggleDemo を実行することで
ウィンドウを出すことができた。
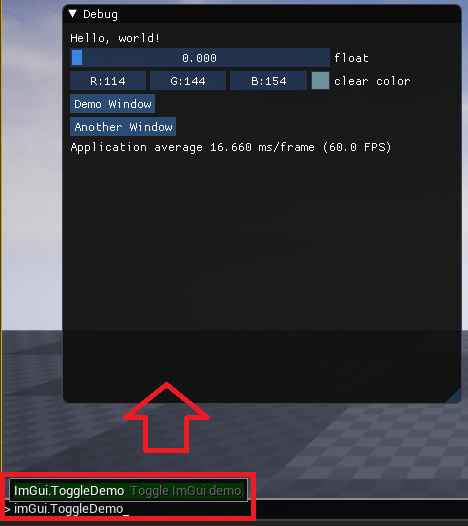
デフォルトでマウスが効かないようになっているので
ImGui.ToggleInput を実行することでマウスがきくようになります。

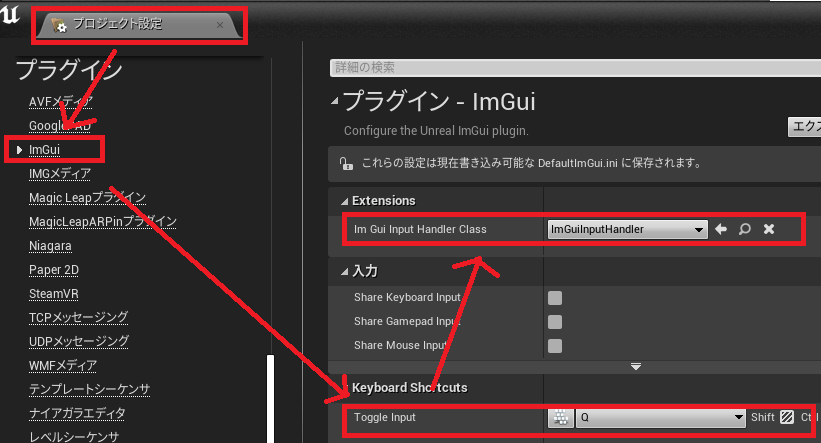
いちいちImGui.ToggleInputするのが面倒くさいときの対処手順
・プロジェクト設定を開く
・ImGui>ToggleInput に適当なキーボードショートカットを割り振る
・ImGui>ImGuiInputHandlerClass を ImGuiInputHandler に設定
すると ImGui.ToggleInput をしなくてもよくなります。
ImGuiのデモの表示方法はわかったので、
次に自作のウィンドウの作成方法を試してみました。
プロジェクトのBuild.csファイルを修正し ImGui のモジュールを追加します。
ImGuiTest.Build.cs)
using UnrealBuildTool;

public class GuiTest : ModuleRules
{
	public GuiTest(ReadOnlyTargetRules Target) : base(Target)
	{
		PCHUsage = PCHUsageMode.UseExplicitOrSharedPCHs;

		PublicDependencyModuleNames.AddRange(new string[] { "Core", "CoreUObject", "Engine", "InputCore", "ImGui" });

		PrivateDependencyModuleNames.AddRange(new string[] {  });
	}
}
ImGuiCommon.h、ImGuiTest.h、ImGuiTest.cpp
ファイルを作成しそれぞれ以下のコードを入力し試してみた。
※参考サイトのコードそのままですが・・

※GenerateVisualStudioProjectFilesを実行はおわすれなく。
ImGuiCommon.h)
#pragma once

#ifdef IMGUI_API
#define WITH_IMGUI 1
#else
#define WITH_IMGUI 0
#endif

#if WITH_IMGUI
#include <ImGuiModule.h>
#include <ImGuiDelegates.h>

#include <imgui.h>
#endif
ImGuiTest.h)
#pragma once

#include "CoreMinimal.h"
#include "GameFramework/Actor.h"
#include "ImGuiCommon.h"

#include "ImGuiTest.generated.h"

UCLASS()
class GUITEST_API AImGuiTest : public AActor
{
	GENERATED_BODY()

public:
	AImGuiTest();

	virtual void BeginPlay() override;
	virtual void EndPlay(const EEndPlayReason::Type EndPlayReason) override;
	virtual void Tick(float DeltaTime) override;

#if WITH_IMGUI
	void ImGuiTick();
#endif
};
ImGuiTest.cpp)
#include "ImGuiTest.h"

AImGuiTest::AImGuiTest()
{
	PrimaryActorTick.bCanEverTick = true;
}

void AImGuiTest::BeginPlay()
{
	Super::BeginPlay();
#if WITH_IMGUI
	FImGuiDelegates::OnWorldDebug().AddUObject(this, &AImGuiTest::ImGuiTick);
#endif
}

void AImGuiTest::EndPlay(const EEndPlayReason::Type EndPlayReason)
{
	Super::EndPlay(EndPlayReason);
#if WITH_IMGUI
	FImGuiDelegates::OnWorldDebug().RemoveAll(this);
#endif
}

void AImGuiTest::Tick(float DeltaTime)
{
	Super::Tick(DeltaTime);
#if WITH_IMGUI
	ImGui::Begin("ImGui Debug Order Test");
	ImGui::Text("Actor Tick: Actor = '%ls', World = '%ls', CurrentWorld = '%ls'", *GetNameSafe(this), *GetNameSafe(GetWorld()), *GetNameSafe(GWorld));
	ImGui::End();
#endif
}

#if WITH_IMGUI
void AImGuiTest::ImGuiTick()
{
	ImGui::Begin("ImGui Debug Order Test");
	ImGui::Text("ImGui World Tick: Actor = '%ls', World = '%ls', CurrentWorld = '%ls'", *GetNameSafe(this), *GetNameSafe(GetWorld()), *GetNameSafe(GWorld));
	ImGui::End();
}
#endif
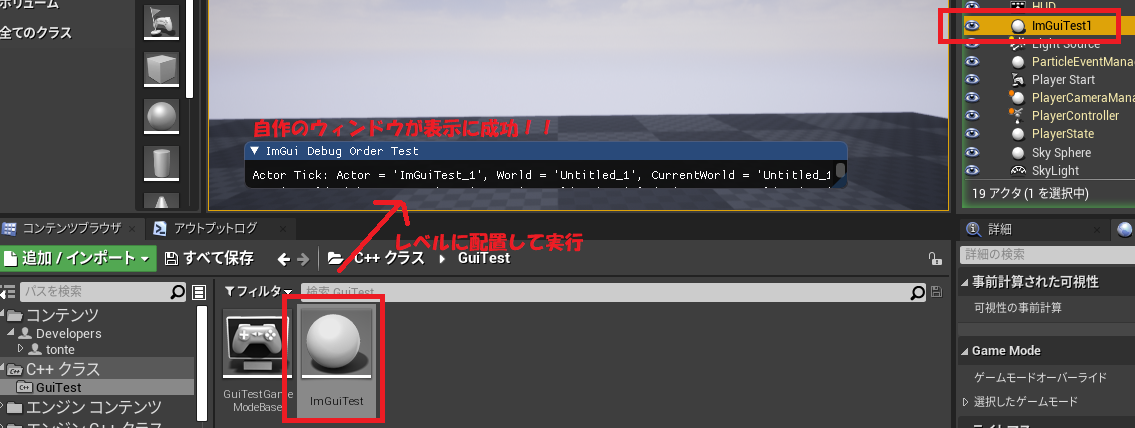
ビルドがとおり実行すると
ImGuiTestアクターというアセットが作られています。
アクターのスポーンと同時にウィンドウが表示される仕組みになっています。
レベルに配置してプレイすると
無事自作ウィンドウが表示されていることを確認できました。
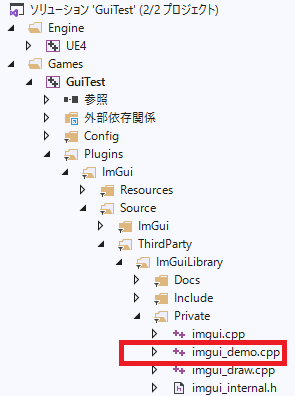
サンプルのパクり方!
ImGuiの仕様のコツはimgui_demo.cppからパクってくるのがコツです。
適当にコードをコピーするだけでこんなウィンドウを自作することができました。

なおimgui_demo.cppからもってきたソースコードです。
ImGuiTest.h)
#pragma once

#include "CoreMinimal.h"
#include "GameFramework/Actor.h"
#include "ImGuiCommon.h"

#include "ImGuiTest.generated.h"

UCLASS()
class GUITEST_API AImGuiTest : public AActor
{
	GENERATED_BODY()

public:
	AImGuiTest();

	virtual void Tick(float DeltaTime) override;
};
ImGuiTest.cpp)
#include "ImGuiTest.h" AImGuiTest::AImGuiTest() { PrimaryActorTick.bCanEverTick = true; } void AImGuiTest::Tick(float DeltaTime) { Super::Tick(DeltaTime); #if WITH_IMGUI if (ImGui::TreeNode("Basic")) { static int clicked = 0; if (ImGui::Button("Button")) clicked++; if (clicked & 1) { ImGui::SameLine(); ImGui::Text("Thanks for clicking me!"); } static bool check = true; ImGui::Checkbox("checkbox", &check); static int e = 0; ImGui::RadioButton("radio a", &e, 0); ImGui::SameLine(); ImGui::RadioButton("radio b", &e, 1); ImGui::SameLine(); ImGui::RadioButton("radio c", &e, 2); // Color buttons, demonstrate using PushID() to add unique identifier in the ID stack, and changing style. for (int i = 0; i < 7; i++) { if (i > 0) ImGui::SameLine(); ImGui::PushID(i); ImGui::PushStyleColor(ImGuiCol_Button, (ImVec4)ImColor::HSV(i/7.0f, 0.6f, 0.6f)); ImGui::PushStyleColor(ImGuiCol_ButtonHovered, (ImVec4)ImColor::HSV(i/7.0f, 0.7f, 0.7f)); ImGui::PushStyleColor(ImGuiCol_ButtonActive, (ImVec4)ImColor::HSV(i/7.0f, 0.8f, 0.8f)); ImGui::Button("Click"); ImGui::PopStyleColor(3); ImGui::PopID(); } // Use AlignTextToFramePadding() to align text baseline to the baseline of framed elements (otherwise a Text+SameLine+Button sequence will have the text a little too high by default) ImGui::AlignTextToFramePadding(); ImGui::Text("Hold to repeat:"); ImGui::SameLine(); // Arrow buttons with Repeater static int counter = 0; float spacing = ImGui::GetStyle().ItemInnerSpacing.x; ImGui::PushButtonRepeat(true); if (ImGui::ArrowButton("##left", ImGuiDir_Left)) { counter--; } ImGui::SameLine(0.0f, spacing); if (ImGui::ArrowButton("##right", ImGuiDir_Right)) { counter++; } ImGui::PopButtonRepeat(); ImGui::SameLine(); ImGui::Text("%d", counter); ImGui::Text("Hover over me"); if (ImGui::IsItemHovered()) ImGui::SetTooltip("I am a tooltip"); ImGui::SameLine(); ImGui::Text("- or me"); if (ImGui::IsItemHovered()) { ImGui::BeginTooltip(); ImGui::Text("I am a fancy tooltip"); static float arr[] = { 0.6f, 0.1f, 1.0f, 0.5f, 0.92f, 0.1f, 0.2f }; ImGui::PlotLines("Curve", arr, IM_ARRAYSIZE(arr)); ImGui::EndTooltip(); } ImGui::Separator(); ImGui::LabelText("label", "Value"); { // Using the _simplified_ one-liner Combo() api here // See "Combo" section for examples of how to use the more complete BeginCombo()/EndCombo() api. const char* items[] = { "AAAA", "BBBB", "CCCC", "DDDD", "EEEE", "FFFF", "GGGG", "HHHH", "IIII", "JJJJ", "KKKK", "LLLLLLL", "MMMM", "OOOOOOO" }; static int item_current = 0; ImGui::Combo("combo", &item_current, items, IM_ARRAYSIZE(items)); ImGui::SameLine(); } { static char str0[128] = "Hello, world!"; ImGui::InputText("input text", str0, IM_ARRAYSIZE(str0)); ImGui::SameLine(); static char str1[128] = ""; ImGui::InputTextWithHint("input text (w/ hint)", "enter text here", str1, IM_ARRAYSIZE(str1)); static int i0 = 123; ImGui::InputInt("input int", &i0); ImGui::SameLine(); static float f0 = 0.001f; ImGui::InputFloat("input float", &f0, 0.01f, 1.0f, "%.3f"); static double d0 = 999999.00000001; ImGui::InputDouble("input double", &d0, 0.01f, 1.0f, "%.8f"); static float f1 = 1.e10f; ImGui::InputFloat("input scientific", &f1, 0.0f, 0.0f, "%e"); ImGui::SameLine(); static float vec4a[4] = { 0.10f, 0.20f, 0.30f, 0.44f }; ImGui::InputFloat3("input float3", vec4a); } { static int i1 = 50, i2 = 42; ImGui::DragInt("drag int", &i1, 1); ImGui::SameLine(); ImGui::DragInt("drag int 0..100", &i2, 1, 0, 100, "%d%%"); static float f1=1.00f, f2=0.0067f; ImGui::DragFloat("drag float", &f1, 0.005f); ImGui::DragFloat("drag small float", &f2, 0.0001f, 0.0f, 0.0f, "%.06f ns"); } { static int i1=0; ImGui::SliderInt("slider int", &i1, -1, 3); ImGui::SameLine(); static float f1=0.123f, f2=0.0f; ImGui::SliderFloat("slider float", &f1, 0.0f, 1.0f, "ratio = %.3f"); ImGui::SliderFloat("slider float (curve)", &f2, -10.0f, 10.0f, "%.4f", 2.0f); static float angle = 0.0f; ImGui::SliderAngle("slider angle", &angle); // Using the format string to display a name instead of an integer. // Here we completely omit '%d' from the format string, so it'll only display a name. // This technique can also be used with DragInt(). enum Element { Element_Fire, Element_Earth, Element_Air, Element_Water, Element_COUNT }; const char* element_names[Element_COUNT] = { "Fire", "Earth", "Air", "Water" }; static int current_element = Element_Fire; const char* current_element_name = (current_element >= 0 && current_element < Element_COUNT) ? element_names[current_element] : "Unknown"; ImGui::SliderInt("slider enum", ¤t_element, 0, Element_COUNT - 1, current_element_name); ImGui::SameLine(); } { static float col1[3] = { 1.0f,0.0f,0.2f }; static float col2[4] = { 0.4f,0.7f,0.0f,0.5f }; ImGui::ColorEdit3("color 1", col1); ImGui::SameLine(); ImGui::ColorEdit4("color 2", col2); } { // List box const char* listbox_items[] = { "Apple", "Banana", "Cherry", "Kiwi", "Mango", "Orange", "Pineapple", "Strawberry", "Watermelon" }; static int listbox_item_current = 1; ImGui::ListBox("listbox\n(single select)", &listbox_item_current, listbox_items, IM_ARRAYSIZE(listbox_items), 4); } ImGui::TreePop(); } #endif }
imGuiはとても便利です。
プレイ中UI:ヴィジェットブループリント
プレイ中のデバッグ用UI:ImGui ←☆New
プレイ前のデバッグ用UI:エディタユーティリティヴィジェット
といったところでしょうか。